How to Track and Use GCLID Data in Your Google Ads Campaigns: Enriching You Reports for Free

The Google Click Identifier (GCLID) is a unique parameter that Google Ads appends to your URLs to help advertisers track user interactions and conversions more accurately. By capturing and analyzing GCLID data, marketers gain detailed insights into which ads, keywords, and campaigns are driving performance. Integrating a dedicated platform with Google Ads allows you to automate the collection, reporting, and optimization of GCLID data for maximum ROI.
However, to enable this feature, you need to tag your Google Ads final URLs with a parameter called gclid, which stands for Google Click Identifier.
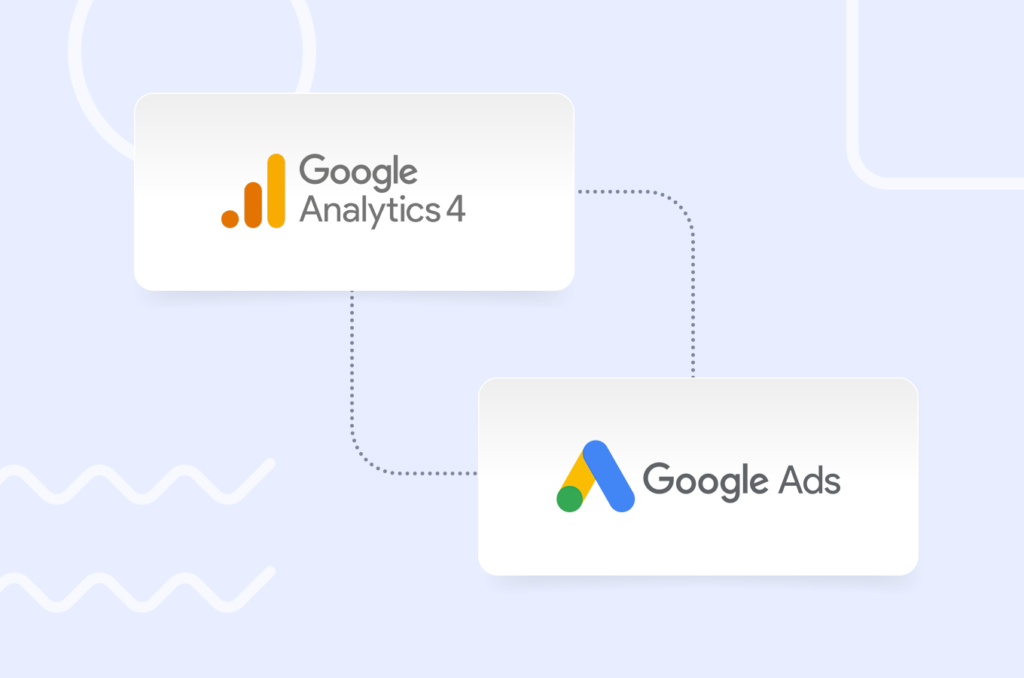
In this article, we will explain how to add gclid data to Google Analytics 4 in two ways: by enabling auto-tagging in Google Ads or by manually tagging your final URLs with tracking variables. We will also discuss the benefits of passing gclid data to GA4 and some common issues and solutions related to gclid tracking.
What is GCLID?
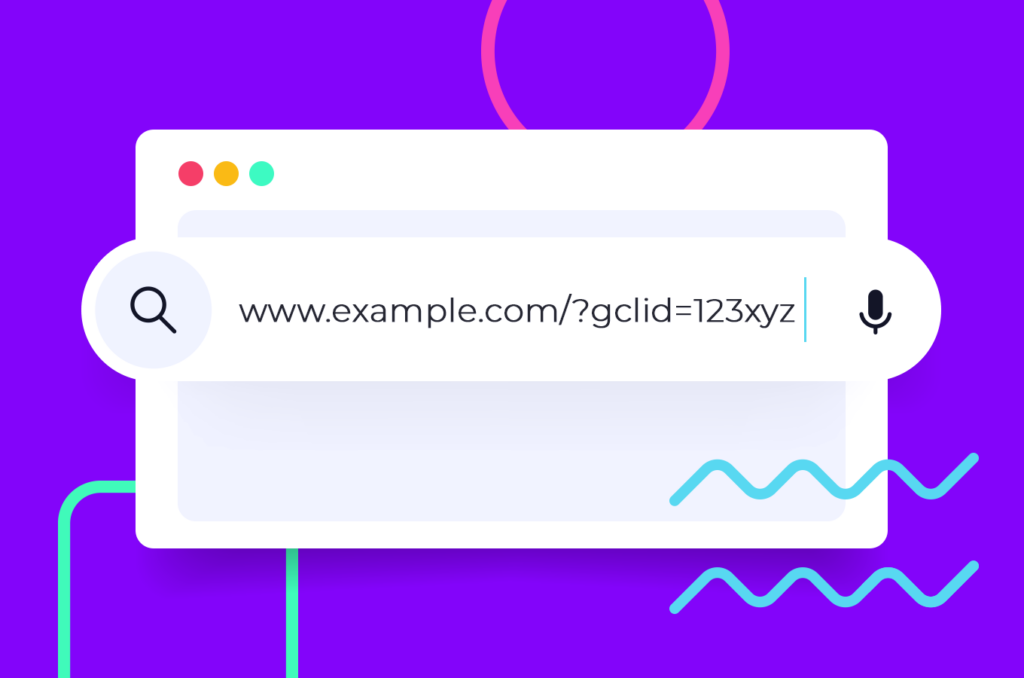
The gclid is a unique string of characters that is added to your landing page URL when a user clicks on your ad served by Google Ads. For example, if your landing page URL is www.example.com, it will appear as www.example.com/?gclid=123xyz when a user clicks on your ad.
The gclid parameter helps Google Analytics 4 identify which ad and keyword triggered the click and to attribute the subsequent actions on your website to that click. This way, you can get more detailed and accurate data about your Google Ads performance in GA4.
Many platforms use their own click identifying values – Facebook has fbclid, Microsoft Advertising has msclkid. A dedicated performance ad tracker uses its own click ID to reliably identify users across different platforms and to enable marketers’ optimization options on a massive scale.
GCLID vs UTM: Who Do They Compare?
GCLID (Google Click Identifier) and UTM (Urchin Tracking Module) parameters are both used for tracking and measuring the effectiveness of online advertising campaigns, but they serve different purposes and operate in distinct ways. GCLID is an auto-generated, unique tracking parameter added to the URL by Google Ads when someone clicks on an ad. It allows for precise tracking of ad performance within Google’s ecosystem, facilitating detailed reports on conversions, user behavior, and ad interactions. GCLID data is primarily used within Google Analytics and Google Ads for automated attribution and campaign performance analysis.
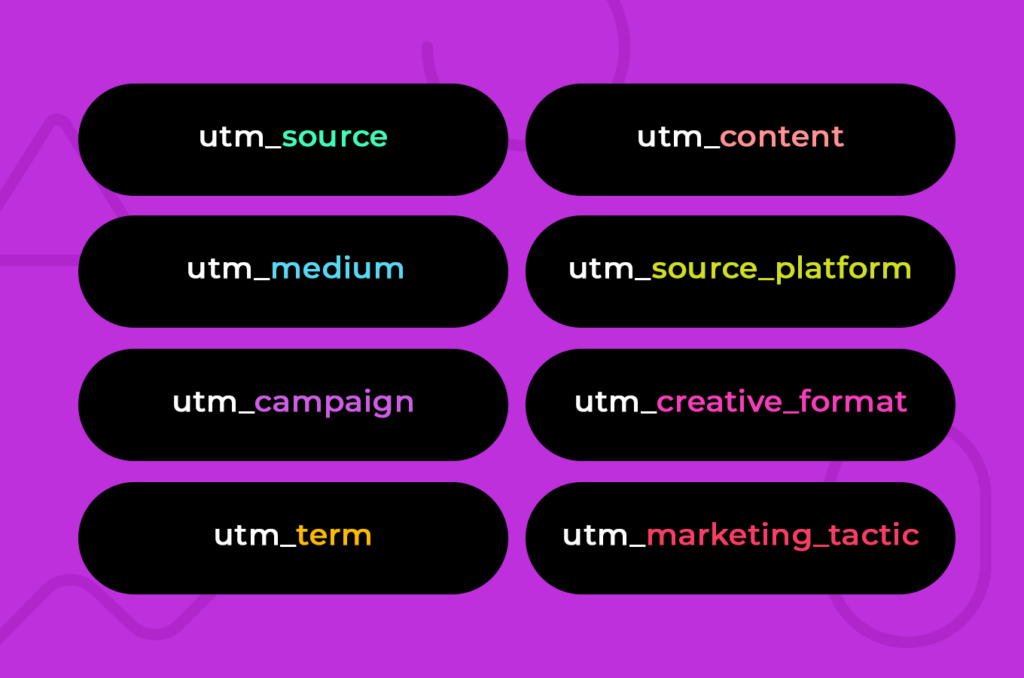
In contrast, UTM parameters are customizable tags appended to URLs that enable tracking across various platforms, not just within Google. These parameters (such as utm_source, utm_medium, utm_campaign) can be manually added to URLs to provide detailed insights into traffic sources, campaign effectiveness, and user engagement in Google Analytics and other analytics tools. While GCLID offers seamless integration and detailed tracking within Google’s suite, UTM parameters provide flexibility and broad applicability across multiple marketing channels, making them ideal for comprehensive cross-platform tracking.
What Are The Benefits of Passing GCLID Data to Google Analytics 4?
Passing gclid data to Google Analytics 4 has several advantages for measuring and optimizing website performance. First and foremost, it allows you to clearly identify traffic that comes from Google Ads. Additional benefits allow you to look into your data with more detail.
- You can see which keywords, ads, ad groups, campaigns, and networks are driving the most traffic and conversions on your website. This can help you optimize your bidding, targeting, and messaging strategies for your Google Ads campaigns.
- You can use enhanced measurement features in GA4, such as scroll tracking, outbound link clicks, video engagement, file downloads, and site search. These features can help you understand how users interact with your website content and what actions they take after clicking on your ads.
- You can create custom audiences in GA4 based on the behavior of users who clicked on your ads. For example, you can create an audience of users who clicked on a specific keyword or ad group and then visited a certain page or completed a certain goal on your website. You can then use these audiences for remarketing or personalization purposes in Google Ads or other platforms.
- You can use conversion modeling in GA4, which uses machine learning to estimate conversions that are not directly observed due to factors such as browser blocking or cross-device behavior. Conversion modeling can help you get a more complete picture of your return on ad spend (ROAS) and optimize your campaigns accordingly.
For marketers looking to understand post-click user behavior and cross-channel attribution, connecting Google Ads with a dedicated platform ensures seamless GCLID data capture and unified reporting.
How To Pass GCLID to Google Analytics?
Including gclid data in your Google Analytics report is a multistep process. First, you need to make sure that this data is appended to your URL. You can do this by enabling auto-tagging or using a URL builder to set up necessary parameters.
Second, you need to configure Google Analytics 4 to recognize gclid data by creating a custom dimension for it.
Third, you need to capture the gclid value with Google Tag Manager or custom JavaScript function. Note that this is not required if you link your Google Ads and Google Analytics accounts and enable auto-tagging.
GCLID vs Gbraid vs Gbaid
Gbraid and Wbraid represent technologies that enhance the functionality of gclid tracking.
Gbraid, or “Global Braid,” is designed to improve cross-device tracking by consolidating user interaction data across different platforms. This helps advertisers gain a more holistic understanding of customer journeys, enabling them to create more targeted and personalized ad experiences.
On the other hand, Wbraid, or “Web Braid,” focuses on refining web-based tracking capabilities to optimize GCLID attribution across various touchpoints within a user’s online journey. Wbraid allows advertisers to gain deeper insights into web interactions, facilitating more accurate measurement and optimization of advertising efforts. By combining the capabilities of Gbraid and Wbraid, advertisers can leverage a more sophisticated toolset to enhance campaign performance and deliver more relevant content to their target audiences.
GCLID and cross-domain tracking
When it comes to cross-domain tracking, businesses often encounter challenges in maintaining a cohesive view of user journeys across different domains. These challenges may arise due to issues like cookie restrictions, browser privacy settings, or variations in tracking implementation.
Despite these challenges, GCLID data proves invaluable in ensuring accurate cross-domain tracking. GCLID serves as a reliable thread that links user interactions seamlessly across various domains, offering advertisers a more comprehensive understanding of customer behavior and enabling them to optimize their campaigns for better performance.
How to Enable Auto-Tagging in Google Ads
The easiest and recommended way to add gclid data to Google Analytics 4 is to enable auto-tagging in Google Ads. Auto-tagging automatically appends the gclid parameter to your final URLs without requiring any manual intervention. When you have auto-tagging enabled and a Google Analytics 4 tag on your website, the gclid data will be stored in a new Google Analytics cookie.
Auto-tagging also ensures that you get the most detailed and accurate data from your linked Google Ads account in GA4.
To enable auto-tagging in Google Ads, follow these steps:
- Sign in to your Google Ads account.
- Click “Settings” on the left page menu.
- Click “Account settings” at the top of the page.
- Click the “Auto-tagging” section.
- Check the box next to “Tag the URL that people click through from my ad”.
- Click “Save”.
Once you enable auto-tagging, you should see the gclid parameter in your landing page URLs when you test your ads. You should also see data from your linked Google Ads account in GA4 under Acquisition > All traffic > Source/Medium or Acquisition > Google Ads.
How to Manually Tag Your Final URLs with Tracking Variables
In some cases, you may not be able to use auto-tagging or you may want to use additional tracking variables besides gclid. For example, you may have a website that does not allow arbitrary URL parameters or you may want to track other parameters such as campaign name or ad content.
In these cases, you can manually tag your final URLs with tracking variables using the Google Analytics Campaign URL Builder tool. This tool helps you generate URLs with custom parameters that can be recognized by GA4. These parameters are called UTM parameters, and you can manually set your campaigns to pass gclid and other data:
How to Set Up Google Analytics 4 to Get GCLID Data?
The last thing to do when setting up passing gclid data to Google Analytics 4 is to create a custom dimension. Custom dimensions allow users to define and receive very detailed layers of data. For example, marketers may distinguish between clicking between specific links rather than just registering a general page click event.
If you create a custom dimension for gclid data, you will be able to view Google Ads as a source in your reports.
To create a custom dimension, follow these steps:
- Sign in to your Google Analytics account.
- Go to Admin settings.
- Go to Custom definitions and click “Create custom dimension“.
- Name the new custom dimension “gclid“.
- For scope, select “User“.
- Save your changes.
How to Set Up Google Tag Manager to Capture GCLID Value
You can use Google Tag Manager, a service that allows you to manage all your tracking and analytical scripts in one place, to capture gclid value.
To create a custom variable, follow these steps:
- Open your GTM container.
- In the Variables section, add a new User-Defined variable.
- For Variable Type, select “URL“.
- For Component Type, select “Query“.
- For Query Key, type in “gclid“.
- Leave all other settings as they are and save the variable.
To set up a tag, follow these steps:
If you already use GTM to put Google Analytics on your website, go to your existing tag. Otherwise, create a new tag for Universal Analytics.
- In the tag configuration, open the dropdown for Google Analytics Settings and create a new variable.
- Add a Custom Dimension under ‘More Settings’.
- For Dimension Value, click on the brick icon to open your available list of variables. Select the variable you created previously.
GCLID troubleshooting
Despite its effectiveness, gclid tracking is not immune to common challenges that can affect the accuracy of data and insights. Some prevalent issues include:
- Cookie Restrictions and Privacy Settings: Stricter browser privacy settings and cookie restrictions can hinder the ability of gclid to track user interactions accurately. Users may block or delete cookies, disrupting the continuity of tracking.
- Incomplete Tagging: Inaccuracies may arise if there are gaps or errors in the tagging of URLs with gclid parameters. Incomplete tagging can result in missed attribution or misattribution of user interactions.
- Cross-Domain Tracking Discrepancies: Challenges often emerge when tracking user journeys across different domains. Variations in tracking implementation or issues related to third-party cookies can lead to discrepancies in cross-domain tracking.
To troubleshoot these issues and maintain the integrity of gclid tracking, businesses can implement the following strategies:
- Regular Audits and Checks: Conduct routine audits of your tracking setup to ensure that gclid parameters are correctly implemented and that there are no gaps in tagging.
- Educate Users on Cookie Settings: Provide clear information to users about the importance of cookies for a seamless tracking experience. Encourage users to adjust privacy settings or whitelist your domain for improved tracking.
- Implement Cross-Domain Tracking Best Practices: Follow Google’s recommended best practices for cross-domain tracking, ensuring consistent implementation across all domains. This may involve adjusting cookie settings and ensuring proper configuration of tracking codes.
- Stay Informed about Updates: Keep abreast of updates and changes in tracking mechanisms, especially those related to privacy regulations. Adjust your tracking setup accordingly to align with evolving industry standards.
- Utilize Fallback Mechanisms: Implement fallback mechanisms or alternative tracking methods to address situations where cookies are blocked or deleted. This can help maintain tracking continuity in the face of privacy challenges.
By addressing these common issues through proactive troubleshooting and staying informed about best practices, businesses can enhance the reliability of gclid tracking, ensuring more accurate insights into user interactions and optimizing the effectiveness of their online advertising efforts.
What Is The Future of GCLID tracking
Looking ahead, future trends in gclid tracking and analytics are likely to see advancements driven by changes in online advertising and user behavior. As digital ecosystems evolve, gclid tracking may incorporate more sophisticated attribution models, leveraging machine learning and AI to provide deeper insights into user journeys. Additionally, advancements in privacy regulations may influence the way gclid handles user data, emphasizing a balance between personalized advertising and user privacy. The evolving landscape of online advertising and technology will undoubtedly shape the future of gclid , making it imperative for businesses to stay adaptable and embrace emerging trends to maintain effective campaign tracking and analysis.
Voluum Click ID is Designed for Multi-Platform Tracking
As hinted before, all ad networks or analytical services use their own proprietary click IDs to manage what is going on and correctly attribute (connect) events in a logical order.
Voluum, a performance ad tracker, has been built with the idea of exchanging click IDs between various platforms: ad networks, your own landing pages, and offers that are sometimes sourced from third-party platforms such as affiliate networks. Voluum can receive click IDs from all traffic sources, pass its own click ID to these affiliate networks and, once a conversion occurs, reverse the whole process to record a conversion and pass information about it to the traffic source.
To achieve this, Voluum uses either scripts that store click IDs in a cookie or an HTTP request that needs little setup to allow communication between various parts of your campaign funnel.
While gclid data only identifies traffic coming from a single source – Google Ads – the Voluum click ID is great for connecting traffic coming from various sources with offers that are your own or supplied by an affiliate network. While Voluum does not allow for in-depth analysis of single link clicks like Google Analytics does, it is great for large-scale testing and optimization efforts.
For certain use cases, Voluum can be a great replacement for Google Analytics 4 or work as an addendum to what GA4 has to offer.
Make sure to check out Voluum for free!
Frequently Asked Questions
Question: What is GCLID and why is it important in Google Ads campaigns?
GCLID (Google Click Identifier) is a unique tracking parameter that Google Ads adds to URLs through auto-tagging. It enables the precise tracking of user behavior after an ad click, allowing marketers to attribute conversions and optimize campaigns based on real performance.
Question: How can I capture and analyze GCLID data?
GCLID data can be captured by enabling auto-tagging in your Google Ads account, and then integrating your landing page and analytics platform to record and interpret the parameter. Dedicated platforms make this process seamless, connecting click data with post-click conversions for granular analysis.
Question: What are the benefits of tracking GCLID data with Voluum?
By integrating Voluum with Google Ads, marketers can automatically collect GCLID data and link it to conversions, traffic sources, and costs. Voluum provides powerful real-time reporting and automation, making it easier to optimize bids, creatives, and targeting based on actual campaign results[1].
Question: Can I use Voluum with other ad networks in addition to Google Ads?
Yes, Voluum is designed to work with a variety of advertising platforms, including Facebook, TikTok, Taboola, Outbrain, and more. This allows for centralized tracking and optimization of all paid and organic traffic sources[2].
Q5: How does tracking GCLID help improve my marketing ROI?
Tracking GCLID enables you to accurately measure which keywords, ads, and campaigns deliver the most valuable traffic and conversions. With a dedicated ad tracking software, this information can be automated into optimization rules, so you can scale what works and eliminate waste faster.


