Google Tag Manager and tag managers, in general, are the answer to the growing need for tracking the performance of websites and entire campaign funnels down to the last detail. They give marketers the power to gather mountains of data without hiring a web developer.
Google Tag Manager tracking is easy to learn and implement and should be used by everyone interested in elevating their website visits and engagement statistics.
Did I mention it’s free to use?
Google Tag Manager begs to be used in various marketing activities, from checking the health status of a small e-commerce website to optimizing complex marketing funnels.
Thanks to this guide, you will know how to benefit from using Google Tag Manager and how to combine it with another great marketing analytics software – Google Analytics 4.
What is Google Tag Manager?
Google Tag Manager is a free tool that allows you to add and manage multiple tracking scripts on your website without having to modify the website’s code. These scripts may come from different tools and platforms, from Google Analytics 4 to Voluum. The overarching idea is to add a script to the web page once – Google Tag Manager script – and then never do it again.
How Does GTM Work?

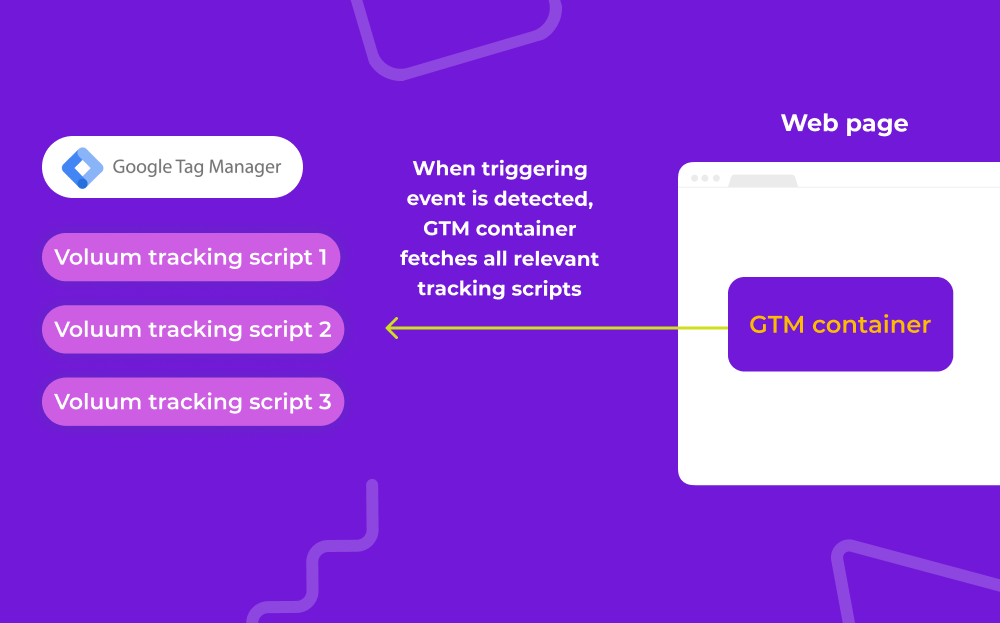
Google Tag Manager’s script acts as a container for all tracking and analytical scripts (in GTM called “tags”) that you use. Once a user launches an action that you define in a trigger, it fetches the tag and launches it within your web page’s code.
This is a great simplification. Whenever you want to modify, add, or remove a tracking script, or change a triggering event, you don’t have to go over all the pages and painstakingly edit their code or hire a dedicated web developer for that.
What Are The Benefits of Using Google Tag Manager?
The short answer is: Google Tag Manager saves you time and, by extension, money. It helps reduce the number of errors that could occur during large-scale manual edits of tens of web pages.
Google Tag Manager also enables Google Analytics to gather more detailed data. With it, you can set up custom events and track custom dimensions.
Additionally, if you use a performance ad tracker such as Voluum, it can help you manage Voluum conversion scripts. If you already have Google Tag Manager set on your site, you can add Voluum tracking with ease and enjoy real-time data, auto-rules, and passing conversions that were tracked with scripts or postbacks (3rd party offers) to Google Ads.
The complete list of Google Tag Manager tracking looks as follows:
- Simplified Tag Management
With Google Tag Manager, you can easily manage multiple tags on your website without involving a web developer. This saves you time and money and allows you to make changes to your website’s tracking quickly and easily.
- Better Performance
By reducing the number of tracking scripts on your website, you can improve your website’s loading speed and performance. This is because fewer scripts mean fewer HTTP requests, which can slow down your website.
- Improved Accuracy
Google Tag Manager allows you to configure your tags and triggers with greater precision, which means you can collect more accurate data on your website’s users and their interactions. This, in turn, allows you to make better-informed decisions about your website’s design and content.
- Enhanced Security
By using Google Tag Manager, you can reduce the risk of security breaches on your website. This is because Google Tag Manager uses a container tag, which means that all your tracking scripts are hosted by Google, rather than on your website’s server.
Google Tag Manager Glossary

- Container: A container is a holding space where all the tags, triggers, and variables are stored. Each website or app can have one or more containers.
- Data Layer: A JavaScript object that stores information about the user and their actions on the site. The data layer can be used to capture and pass data to tags and triggers.
- Debug mode: A feature that helps users troubleshoot issues with their tags and triggers. Debug mode shows a detailed log of all the tag firing and data being captured.
- Preview mode: A feature that allows users to test their tags and triggers before publishing them to the live site. In preview mode, users can see the tags firing and the data being captured.
- Tag: A snippet of code or a tracking pixel that is added to a website or app to track user behavior and gather data.
- Trigger: A condition or rule that specifies when a tag should fire. For example, a trigger can be set up to fire a tag when a user clicks on a specific button or when a page loads.
- Variable: A placeholder that holds a value that can be used by a tag or a trigger. Variables can be used to capture information about the user, such as their location or the time they visited the site. Variables can be built-in or custom.
Google Tag Manager and Google Analytics 4
These two platforms work great in conjunction with each other. While having GTM set up is not a requirement for using GA4, it helps if you want to use the latter platform in a more advanced way. Google Tag Manager allows Google Analytics to:
- Register additional data points passed in variables and registered as custom dimensions
- Track custom events
- Track gclid data
Having a GTM on your site also leaves the door open for adding other tracking or analytical solutions.
Setting up Google Tag Manager
Setting up Google Tag Manager is straightforward. The simplified set up process looks as follows:
- Create a new Google Tag Manager account from scratch or using your existing Google account.
- Create a container.
- Install the container on your website.
- Install the <script> code snippet in the <head> section of your web page.
- Install the <noscript> code snippet immediately after the <body> tag.
- Verify that the installation is correct using the Google Tag Assistant Chrome extension.
Note that if you already have some tracking scripts installed on your web page, you should migrate them to Google Tag Manager. GTM scripts should be ONLY additional scripts on your page.
Creating Tags and Triggers
Now that you have set up Google Tag Manager on your website, it’s time to start creating tags and triggers. Tags are used to collect data on your website, while triggers are used to fire the tags.
Rethinking Tracking Strategy
Not many people realize how much flexibility Google Tag Manager gives to its users. Most people quickly create generic events that launch on each user click without differentiating between what was clicked.
Not all clicks are equally important, and a click on your privacy policy should not affect your strategy as much as a click on the purchase button. Moreover, you can often get to the same page or launch the same action from different places (for example, sign up for a newsletter by clicking on a footer or on a dedicated page) and you should know which path works better.
The more details you want to track, the more complex your setup and harder analysis later will be. So, the first thing to do before creating any tags and triggers is to think through your goals and needs.
Enabling Variables
Variables can enrich the events you collect with additional data points. They may also help you set up triggers to be launched at exactly the moment you want them to (for example, when a concrete link is clicked or page visited).
Google Tag Manager has a list of built-in variables that you need to enable first. Once you do so, you can create additional variables, such as for passing gclid data. You can even use one variable as a basis for another one.
Using Preview Mode
Test tags using the preview feature, it can be very helpful when creating them. You can use this mode to check the IDs of various elements on your page, like menu items, and create precise tags.
However, if you don’t have any triggers set, clicking around your page in preview mode won’t do much good. You have to create the most generic trigger that catches all clicks on a website.
Once you have it, click on a given element in preview mode and look for the details of the clicked element. Note it down, and then you will be able to create a tag that passes this specific information or a trigger that fires only if this concrete link is clicked.
Creating Triggers
To create a trigger in Google Tag Manager:
- Click on “Triggers” in the left-hand menu of your Google Tag Manager dashboard.
- Click on “New” to create a new trigger.
- Select the trigger type you want to create, such as a ‘page view’ or ‘click’ trigger.
- Configure the trigger by entering the required information, such as the URL or element ID.
- Save the trigger and assign it to the appropriate tags.
Creating Tags
To create a tag in Google Tag Manager:
- Click on “Tags” in the left-hand menu of your Google Tag Manager dashboard.
- Click on “New” to create a new tag.
- Select the tag type you want to create, such as Google Analytics (Google Analytics: GA4 Event), Facebook Pixel, or any other third-party tool you want to use.
- Configure the tag by entering the required information, such as the tracking ID or conversion ID.
- Choose a trigger to fire the tag.
Google Tag Manager Alternatives

While Google Tag Manager is a great tool for managing tags and tracking scripts, it’s not the only option available. Here are some alternatives to Google Tag Manager:
Tealium
Tealium is an enterprise-level tag management platform that provides a range of features, including data governance, audience segmentation, and real-time data streaming. It’s designed for large organizations that require a more robust and customizable solution for managing their tags.
Adobe Tag Manager
Adobe Tag Manager is another enterprise-level tag management platform that’s part of the Adobe Marketing Cloud suite. It provides a range of features, including real-time data collection, audience segmentation, and integration with Adobe Analytics and Adobe Target.
Segment
Segment is a customer data platform that provides a range of features, including tag management, event tracking, and data routing. It’s designed to help businesses collect, clean, and unify their customer data from various sources, including websites, mobile apps, and third-party tools.
Google Tag Manager Tracking With Voluum
If you’re looking for a performance ad tracker that integrates with Google Tag Manager, look no further than Voluum. Voluum is a cloud-based ad tracker that provides a range of features, including real-time data tracking, ad optimization, and audience targeting.
Google Tag Manager allows you to manage all Voluum tracking scripts:
- Conversion tracking script: for this, create a ‘Custom image’ tag type and provide Conversion tracking pixel URL.
- Lander or offer tracking script: for this, create a ‘Custom HTML’ tag type and provide a direct tracking script.
By using Voluum with Google Tag Manager, you can track your ad campaigns more effectively and optimize them for better performance. Whether you’re a beginner or an intermediate user, Voluum can help you take your digital marketing to the next level.
There Are Simply No Reasons For Not Using GTM
Google Tag Manager is a rare example of a tool that gives a lot without asking for much. The versatility it gives marketers to introduce different tracking platforms with ease is outstanding, the integration with Google Analytics 4 is tight, and integration with Voluum is easy.


