
Voluum Conversions Alerts in Telegram with n8n. A Complete Guide.

Picture this: You’re out grabbing coffee, sitting in a meeting, or finally taking that long weekend off. Meanwhile, your campaigns are running, conversions are rolling in, and you have absolutely no idea what’s happening until you log back into Voluum hours later. Maybe a campaign suddenly took off and you missed your chance to scale it. Maybe something broke and you didn’t catch it in time.
What if your phone could just tap you on the shoulder every time a conversion happens?
That’s exactly what we’re going to build today. By the end of this guide, you’ll have a system that watches your Voluum account around the clock and pings your Telegram every single time a new conversion comes in. No more refreshing dashboards. No more checking the platform every five minutes.
Best of all, you don’t need to be a developer to set this up. If you can copy and paste, you can do this.
What We’re Building
Before we dive in, let me explain how this works in simple terms. We’re going to use three tools that talk to each other:
- Voluum is your tracking platform. It already knows when conversions happen.
- n8n is an automation tool. Think of it like a helpful robot assistant that follows the instructions you give it. It will check Voluum every minute and ask, “Any new conversions?”
- Telegram is the messaging app. It’s how the robot will tell you what it found.
The flow looks like this:
Voluum API -> n8n workflow -> Telegram Bot API -> Telegram chat
Every minute, n8n logs into Voluum, asks for the latest conversions, checks if any are new (we don’t want the same conversion announced over and over), and sends you a Telegram message for each fresh one.
That last part is important and worth highlighting. The workflow includes something called deduplication, which is a fancy word for “don’t tell me the same thing twice.” Without it, you’d get spammed with the same conversion notification every minute until you went insane. With it, each conversion shows up exactly once.
What You’ll Need Before Starting
Let’s gather everything in one place so you’re not hunting for things mid-setup.
You need access to:
- An n8n workspace (either a cloud account or a self-hosted instance)
- Your Voluum account (with permission to create API keys)
- A Telegram account on your phone
- About 20 minutes of focused time
You don’t need:
- A server
- Coding experience
- Command line knowledge
Everything happens inside the n8n web interface and your browser.
Step 1: Get Your Voluum API Credentials
Voluum needs to verify it’s really you (or your robot assistant) asking for data. That’s what API credentials are for. Think of them like a username and password specifically for software, not humans.
You’ll need two values from Voluum:
VOLUUM_ACCESS_ID
VOLUUM_ACCESS_KEY
Here’s how to generate them:
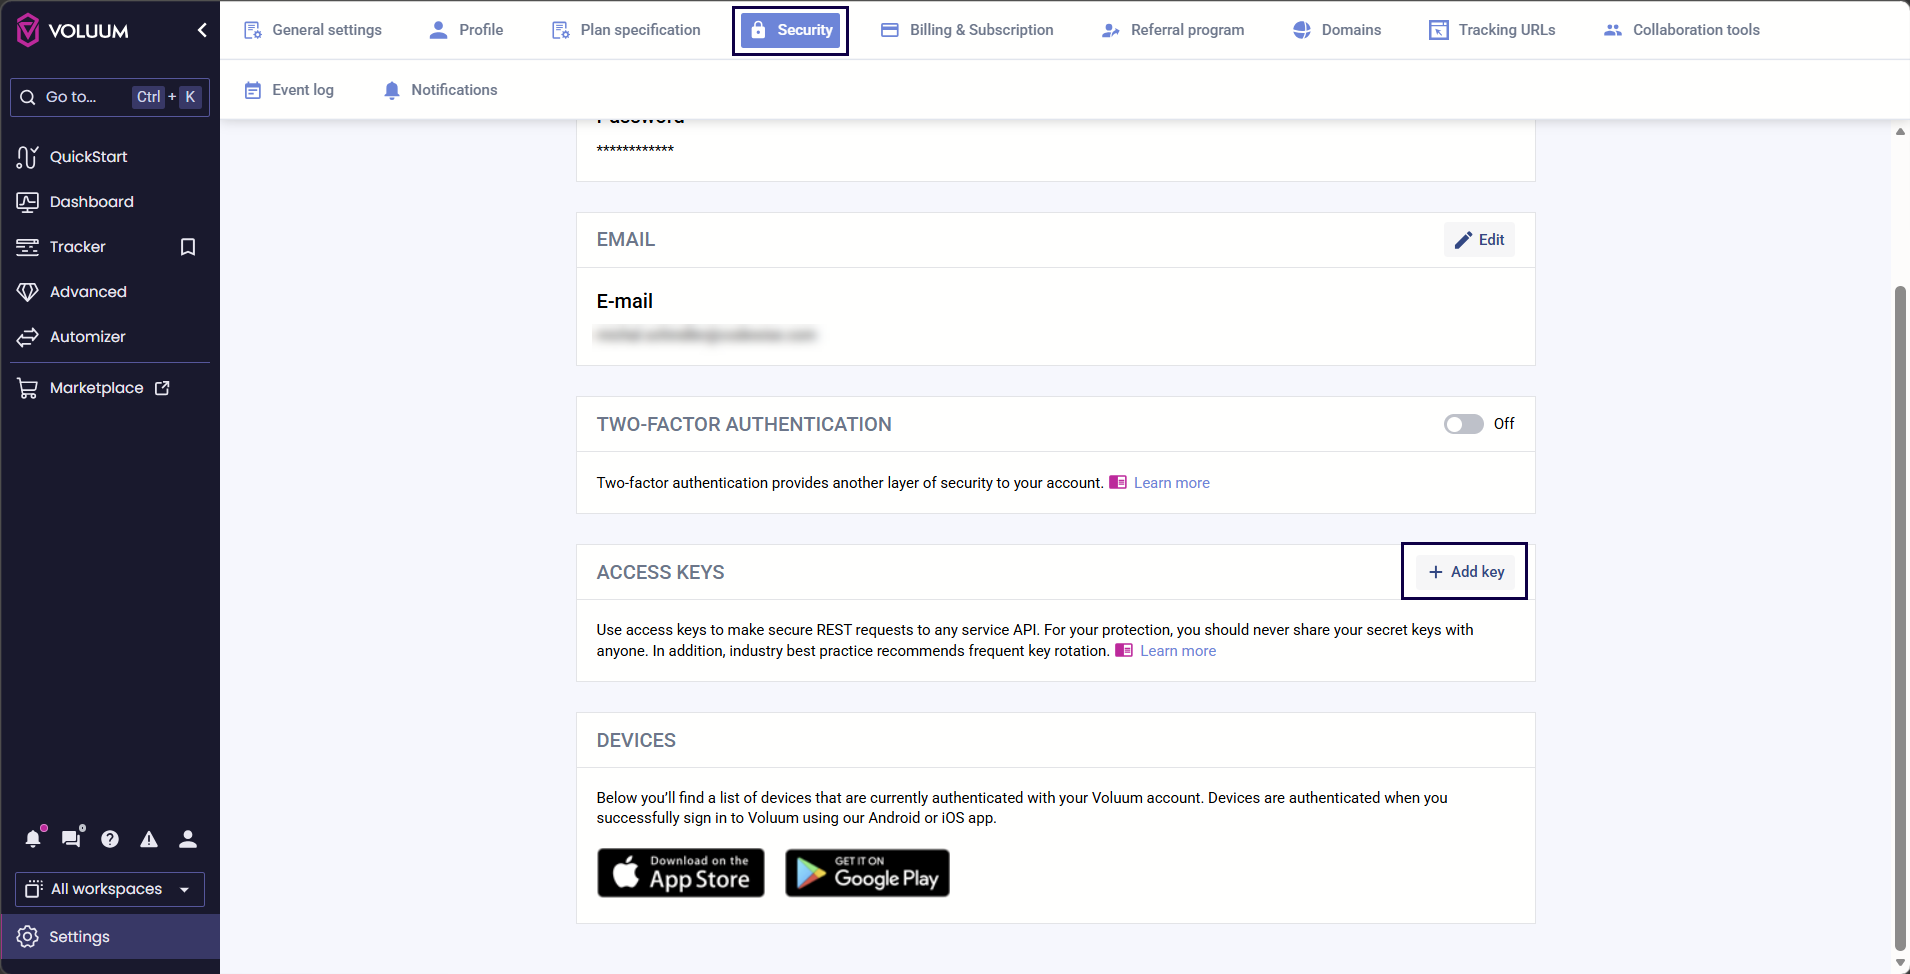
- Log in to Voluum.
- Open Settings and go to Security.
- Find the section called API or access keys.
- Generate a new access key.

- Copy and save both the Access key ID and the Access key.
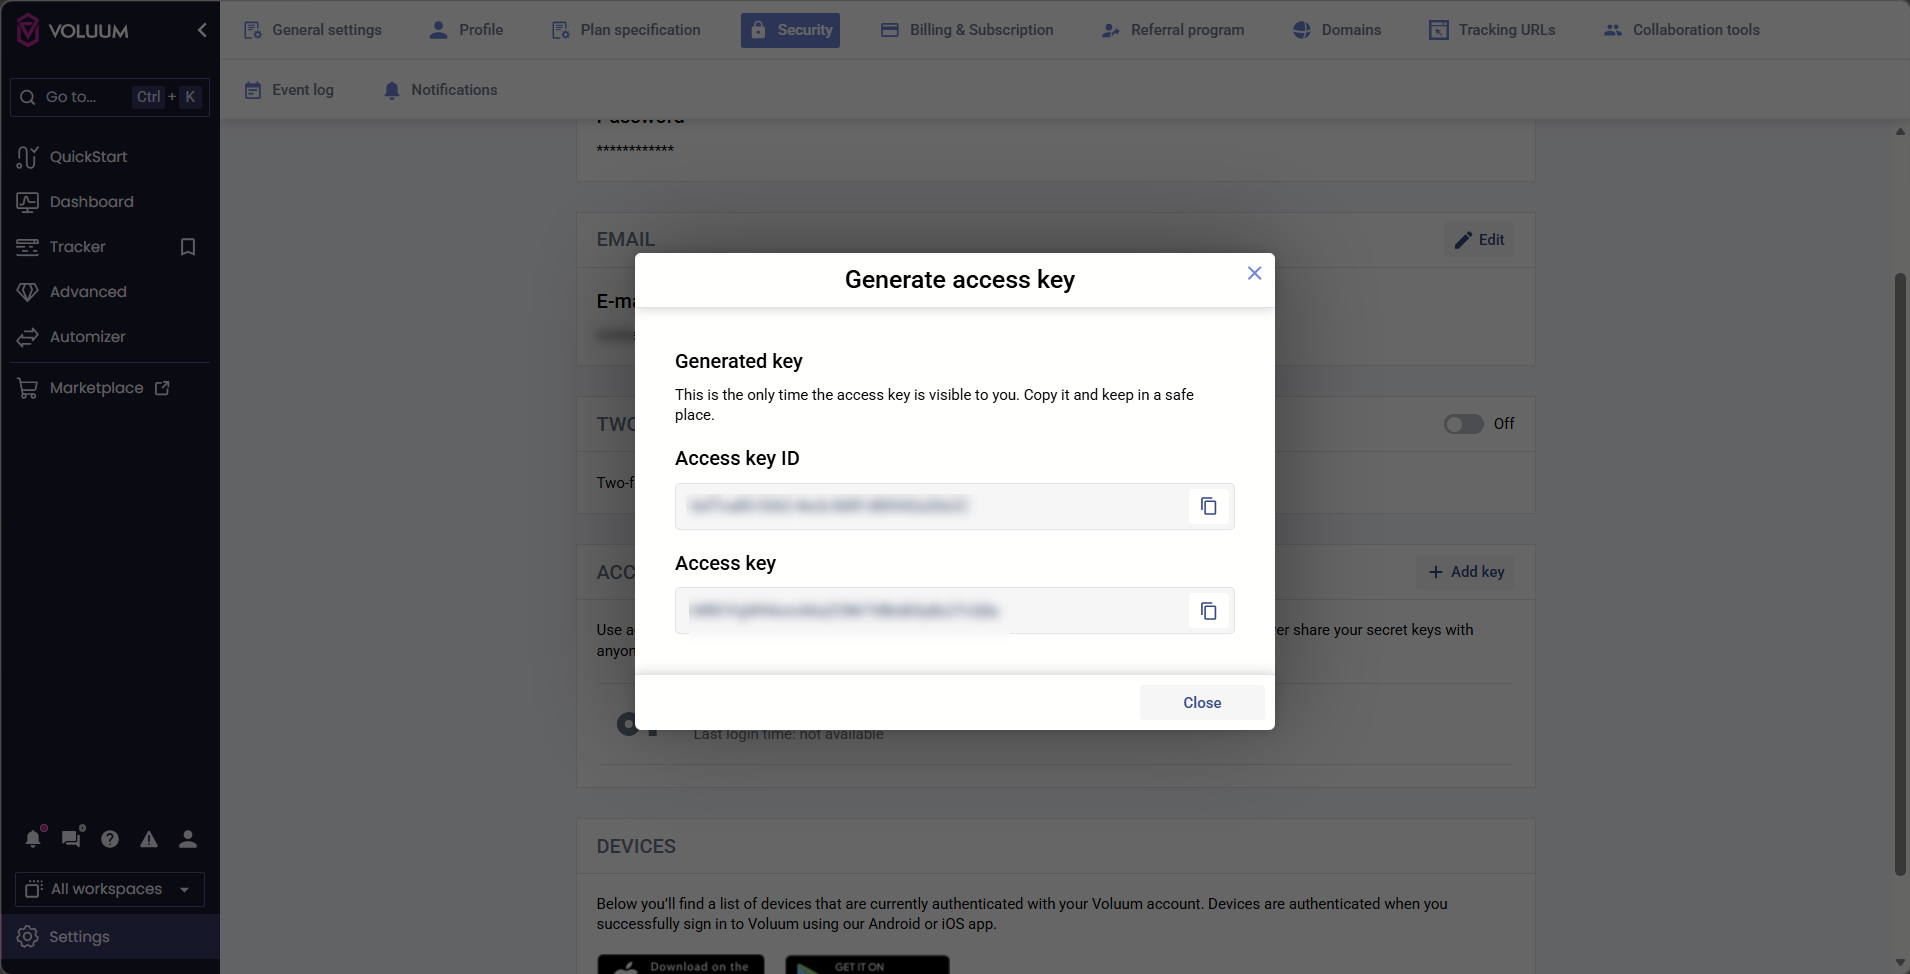
A quick word of warning. The access key is shown only once. If you close the window without copying it, you’ll need to generate a new one. So keep it somewhere safe like a password manager or a temporary text file you’ll delete later.
Step 2: Create Your Telegram Bot
Now for the fun part. You’re going to create your own little Telegram bot that delivers messages to you. It sounds complicated but takes about two minutes.
You’ll need two values from Telegram:
TELEGRAM_BOT_TOKEN
TELEGRAM_CHAT_ID
Creating the Bot
- Open Telegram.
- Search for @BotFather. This is the official bot that creates other bots. Yes, it’s a bot that makes bots.
- Send the message:
/newbot
- Follow the prompts. BotFather will ask for a name (anything you like) and a username (must end in “bot”).
- When you’re done, BotFather will send you a token. It looks something like this:
1234567890:AAExampleTokenValue
That’s your TELEGRAM_BOT_TOKEN. Copy it and keep it private. Anyone with this token can control your bot.
Finding Your Chat ID
The chat ID tells Telegram where to send messages. It’s like the address of your conversation with the bot.
For a private chat (just you and the bot):
- Send any message to your new bot. Just say “hi” or whatever. This step matters because Telegram won’t share chat info until you’ve initiated a conversation.
- Open this URL in your browser, replacing <TELEGRAM_BOT_TOKEN> with your actual token:
https://api.telegram.org/bot<TELEGRAM_BOT_TOKEN>/getUpdates
- You’ll see a wall of JSON text. Don’t panic. Look for a section that says:
"chat": {
"id": 123456789
}
- That number is your TELEGRAM_CHAT_ID.
For a group chat (you and your team):
- Add the bot to the group.
- Send a message in the group so the bot sees it.
- Open the same getUpdates URL.
- Find the group chat ID. Heads up, group chat IDs are usually negative numbers (something like -1001234567890). That’s normal.
Step 3: Decide How to Store Your Credentials
You have two options here, and which one you pick depends on how much access you have to your n8n setup.
Option A: Environment Variables (More Secure)
If you or your administrator can configure environment variables on the n8n server, this is the cleaner approach. Your secrets stay outside the workflow itself.
You’d set these:
VOLUUM_ACCESS_ID=replace-me
VOLUUM_ACCESS_KEY=replace-me
TELEGRAM_BOT_TOKEN=replace-me
TELEGRAM_CHAT_ID=replace-me
VOLUUM_TZ=Etc/GMT
VOLUUM_PAGE_LIMIT=5000
VOLUUM_LOOKBACK_HOURS=1
VOLUUM_SEEN_RETENTION_HOURS=4
Option B: Paste Values Directly (Simpler)
If you only have access to the n8n web client and can’t touch server settings, no problem. You’ll just paste the values into the workflow nodes directly. It’s a bit less secure (anyone with workflow access can see them), but for many teams that’s perfectly fine.
I’ll show both options as we go.
Step 4: Build the Workflow
Time to roll up our sleeves and build the actual automation.
Create the Workflow
- Open n8n.
- Go to the Workflows section.
- Click Create Workflow.
- Name it:
Voluum -> Telegram (Polling)
- Save it.
We’re going to build four nodes connected in a line:
Cron -> Prepare Voluum Config -> Fetch New Voluum Conversions -> Telegram Notify
Each node has a job. The Cron triggers the workflow every minute. The Set node holds your config. The Function node does the heavy lifting (talking to Voluum, checking what’s new). And the HTTP Request node sends the Telegram message.
Add the Cron Node
This is your scheduler. It tells n8n, “Run this workflow every minute.”
- Add a new node and search for Cron.
- Select it.
- Set the Mode to Every Minute.
That’s it. Your workflow will now wake up once a minute to do its thing.
A quick note on polling frequency. Once a minute is a good balance between getting near real-time alerts and not hammering the Voluum API. If you want faster alerts, you could go more frequent, but you risk hitting rate limits. Slower is fine if you don’t need split-second notifications.
Add the Prepare Voluum Config Node
This node holds all your settings in one place, which makes life easier when you want to tweak something later.
- Add a Set node.
- Rename it to Prepare Voluum Config.
- Connect the Cron node to this one.
If you’re using environment variables, switch the node to JSON/raw mode and paste:
={{
{
accessId: $env.VOLUUM_ACCESS_ID,
accessKey: $env.VOLUUM_ACCESS_KEY,
pageLimit: Number($env.VOLUUM_PAGE_LIMIT || 5000),
lookbackHours: Number($env.VOLUUM_LOOKBACK_HOURS || 1),
tz: $env.VOLUUM_TZ || 'Etc/GMT',
retentionHours: Number($env.VOLUUM_SEEN_RETENTION_HOURS || 4)
}
}}
If you’re pasting values directly, use JSON/raw mode and paste:
{
"accessId": "replace-with-voluum-access-id",
"accessKey": "replace-with-voluum-access-key",
"pageLimit": 5000,
"lookbackHours": 1,
"tz": "Etc/GMT",
"retentionHours": 4
}
Here’s what each setting does:
| Field | Description |
| accessId | Your Voluum access key ID |
| accessKey | Your Voluum access key |
| pageLimit | Maximum rows pulled from the API per request |
| lookbackHours | How far back to check for conversions |
| tz | The timezone for Voluum reports |
| retentionHours | How long n8n remembers what conversions it has seen |
The lookbackHours and retentionHours settings are worth understanding. The lookback tells the workflow, “Each time you check, look at the last hour of data.” The retention says, “Remember which conversions you’ve already announced for the last 4 hours so you don’t announce them twice.” These defaults work well for most setups.
Add the Function Node (The Brains of the Operation)
This is where the real work happens. Don’t worry, you don’t need to understand every line. You just need to copy and paste.
- Add a Function node.
- Rename it to Fetch New Voluum Conversions.
- Connect the Set node to this one.
- Paste this script into the code area:
const config = items[0]?.json || {};

const staticData = getWorkflowStaticData('global');

staticData.seen = staticData.seen || {};

const nowMs = Date.now();

const retentionHours = Number(config.retentionHours || 4);

const retentionMs = retentionHours * 60 * 60 * 1000;

for (const [key, meta] of Object.entries(staticData.seen)) {

  const seenAt = meta && typeof meta === 'object' ? meta.seenAt : meta;

  if (!seenAt || nowMs - seenAt > retentionMs) {

    delete staticData.seen[key];

  }

}

const accessId = config.accessId;

const accessKey = config.accessKey;

if (!accessId || !accessKey) {

  throw new Error('Missing Voluum access credentials.');

}

const pageLimit = Number(config.pageLimit || 5000);

const lookbackHours = Number(config.lookbackHours || 1);

const tz = config.tz || 'Etc/GMT';

const reportColumns = [

  'postbackTimestamp',

  'campaignId',

  'campaignName',

  'offerId',

  'offerName',

  'conversionType',

  'conversionTypeId',

  'payout',

  'clickId',

  'transactionId',

];

const isoHour = (date) => date.toISOString().replace('.000Z', 'Z');

const currentHourStart = new Date(Date.UTC(

  new Date().getUTCFullYear(),

  new Date().getUTCMonth(),

  new Date().getUTCDate(),

  new Date().getUTCHours(),

  0,

  0,

  0,

));

const from = new Date(currentHourStart.getTime() - lookbackHours * 60 * 60 * 1000);

const to = new Date(currentHourStart.getTime() + 60 * 60 * 1000);

const authResponse = await helpers.httpRequest({

  method: 'POST',

  url: 'https://api.voluum.com/auth/access/session',

  headers: {

    'Content-Type': 'application/json; charset=utf-8',

    Accept: 'application/json',

  },

  body: {

    accessId,

    accessKey,

  },

  json: true,

});

const token = authResponse.token;

if (!token) {

  throw new Error('Voluum auth session did not return a token.');

}

staticData.voluumAuth = {

  token,

  expirationTimestamp: authResponse.expirationTimestamp

    ? new Date(authResponse.expirationTimestamp).getTime()

    : null,

};

const collectedRows = [];

let offset = 0;

while (true) {

  const queryParts = [];

  const addParam = (name, value) => {

    queryParts.push(`${encodeURIComponent(name)}=${encodeURIComponent(String(value))}`);

  };

  addParam('from', isoHour(from));

  addParam('to', isoHour(to));

  addParam('tz', tz);

  addParam('limit', pageLimit);

  addParam('offset', offset);

  addParam('sort', 'postbackTimestamp');

  addParam('direction', 'ASC');

  for (const column of reportColumns) {

    addParam('column', column);

  }

  const report = await helpers.httpRequest({

    method: 'GET',

    url: `https://api.voluum.com/report/conversions?${queryParts.join('&')}`,

    headers: {

      'cwauth-token': token,

      Accept: 'application/json',

    },

    json: true,

  });

  const rows = Array.isArray(report.rows) ? report.rows : [];

  collectedRows.push(...rows);

  if (rows.length === 0) break;

  if (rows.length < pageLimit) break;

  if (typeof report.totalRows === 'number' && offset + pageLimit >= report.totalRows) break;

  offset += pageLimit;

}

const formatType = (row) => {

  const label = row.conversionType && String(row.conversionType).trim()

    ? String(row.conversionType).trim()

    : '';

  const id = row.conversionTypeId;

  if (label) {

    return id !== undefined && id !== null ? `${label} (#${id})` : label;

  }

  if (id !== undefined && id !== null && String(id).trim() !== '' && Number(id) !== 0) {

    return `type #${id}`;

  }

  return 'standard';

};

const formatPayout = (value) => {

  if (value === null || value === undefined || value === '') {

    return null;

  }

  return String(value);

};

const normalizeDedupeValue = (value) => (

  value === null || value === undefined ? '' : String(value).trim()

);

const buildLegacyKey = (row) => [

  row.campaignId ?? '',

  row.offerId ?? '',

  row.clickId ?? '',

  row.transactionId ?? '',

  row.postbackTimestamp ?? '',

  row.conversionTypeId ?? '',

  row.payout ?? '',

].join('|');

const buildDedupeKey = (row) => JSON.stringify({

  campaignId: normalizeDedupeValue(row.campaignId),

  campaignName: normalizeDedupeValue(row.campaignName),

  offerId: normalizeDedupeValue(row.offerId),

  offerName: normalizeDedupeValue(row.offerName),

  clickId: normalizeDedupeValue(row.clickId),

  transactionId: normalizeDedupeValue(row.transactionId),

  conversionType: normalizeDedupeValue(row.conversionType),

  conversionTypeId: normalizeDedupeValue(row.conversionTypeId),

  payout: normalizeDedupeValue(row.payout),

  postbackTimestamp: normalizeDedupeValue(row.postbackTimestamp),

});

const buildTelegramText = (row) => {

  const parts = [

    'Nowa konwersja w Voluum',

    `Kampania: ${row.campaignName || 'unknown campaign'}`,

    `Typ: ${formatType(row)}`,

  ];

  const payout = formatPayout(row.payout);

  if (payout !== null) {

    parts.push(`Payout: ${payout}`);

  }

  if (row.offerName) {

    parts.push(`Offer: ${row.offerName}`);

  }

  if (row.clickId) {

    parts.push(`Click ID: ${row.clickId}`);

  }

  if (row.transactionId) {

    parts.push(`Transaction ID: ${row.transactionId}`);

  }

  if (row.postbackTimestamp) {

    parts.push(`Czas: ${row.postbackTimestamp}`);

  }

  return parts.join('\n');

};

const output = [];

for (const row of collectedRows) {

  const legacyKey = buildLegacyKey(row);

  const dedupeKey = buildDedupeKey(row);

  if (staticData.seen[dedupeKey]) continue;

  if (staticData.seen[legacyKey]) {

    staticData.seen[dedupeKey] = {

      seenAt: nowMs,

      migratedFromLegacy: true,

    };

    delete staticData.seen[legacyKey];

    continue;

  }

  staticData.seen[dedupeKey] = {

    seenAt: nowMs,

  };

  output.push({

    json: {

      campaignId: row.campaignId ?? '',

      campaignName: row.campaignName ?? '',

      offerId: row.offerId ?? '',

      offerName: row.offerName ?? '',

      clickId: row.clickId ?? '',

      transactionId: row.transactionId ?? '',

      conversionType: row.conversionType ?? '',

      conversionTypeId: row.conversionTypeId ?? 0,

      payout: row.payout ?? null,

      postbackTimestamp: row.postbackTimestamp ?? '',

      dedupeKey,

      telegramText: buildTelegramText(row),

    },

  });

}

return output;
For the curious, here’s a summary of what this script does:
- It logs into Voluum using your credentials and gets a temporary access token.
- It pulls every conversion from the past hour (this catches anything you might have missed).
- It checks each conversion against a memory of conversions it has already seen.
- For any new conversion, it builds a nicely formatted message and passes it along to the next node.
- Old memories get cleaned up automatically so nothing piles up forever.
Notice that the message is in Polish (“Nowa konwersja” means “New conversion,” “Kampania” means “Campaign,” “Typ” means “Type,” “Czas” means “Time”). If you’d prefer English, you can edit the buildTelegramText function near the bottom of the script. Just change those words to whatever you like.
Add the Telegram Notify Node
The final node sends your message to Telegram.
- Add an HTTP Request node.
- Rename it to Telegram Notify.
- Connect the Function node to this one.
Now configure it as follows:
Method: POST
URL (if using environment variables):
={{ ‘https://api.telegram.org/bot’ + $env.TELEGRAM_BOT_TOKEN + ‘/sendMessage’ }}
URL (if pasting directly):
https://api.telegram.org/bot<TELEGRAM_BOT_TOKEN>/sendMessage
(Replace <TELEGRAM_BOT_TOKEN> with your actual token, keeping the bot prefix attached.)
Authentication: None
Body Content Type: Form URL Encoded
Body Parameters:
| Name | Value |
| chat_id | ={{ $env.TELEGRAM_CHAT_ID }} or your direct chat ID |
| text | ={{ $json.telegramText }} |
| disable_web_page_preview | true |
The disable_web_page_preview setting just keeps the messages clean. Without it, if a URL ever sneaks into your conversion data, Telegram would auto-generate a big preview card. Usually unnecessary noise.
Step 5: Activate and Test
You’re at the finish line. Let’s make sure everything works.
- Save the workflow.
- Click Execute workflow to test it manually. This forces it to run right now instead of waiting for the next minute.
- Activate the workflow using the toggle in the top right.
- Wait for a real conversion in Voluum, or trigger a test one.
- Confirm Telegram receives a message.
- Open the Executions tab to verify the workflow ran successfully.
Here’s what should happen:
- New conversion: you get a Telegram message.
- Same conversion checked again: skipped, no spam.
- Same conversion but with a key field changed: you get a fresh message (this is rare and usually means something legitimately changed).
Quick Sanity Checks
If something doesn’t work, these isolated tests help you figure out where the problem is.
Test Telegram on Its Own
Open this URL in your browser, replacing the placeholders:
https://api.telegram.org/bot<TELEGRAM_BOT_TOKEN>/sendMessage?chat_id=<TELEGRAM_CHAT_ID>&text=test
You should see a response like:
{
"ok": true
}
And a “test” message should appear in your Telegram chat. If this doesn’t work, the Telegram side is the problem, not n8n.
Test Voluum Authentication on Its Own
If you have an API tool like Postman or Insomnia, send this request:
POST https://api.voluum.com/auth/access/session
Content-Type: application/json
Accept: application/json
With this body:
{

  "accessId": "replace-with-access-id",

  "accessKey": "replace-with-access-key"

}

You should get back something like:

{

  "token": "..."

}
If this fails, your Voluum credentials are the issue.
Troubleshooting Common Issues
Telegram Node Returns an Error
Check that:
- Your bot token is correct and complete.
- Your chat ID is correct (and remember, group IDs are negative numbers).
- The bot has access to the chat. For groups, make sure the bot was actually added.
- You sent at least one message to the bot before grabbing the chat ID.
Voluum Authentication Fails
Check that:
- The access key ID is correct.
- The access key is correct.
- The key hasn’t been deleted or revoked in Voluum.
- Your Voluum account has API access enabled.
Duplicate Conversion Notifications
If you’re getting the same alert multiple times:
- Make sure the Function node uses getWorkflowStaticData(‘global’). This is the memory the workflow uses to track what it has already seen.
- Confirm the workflow is saved AND activated.
- Verify the deduplication key includes the right fields for your case.
- Check whether some values are actually changing between polls (rare, but possible if data is updating retroactively).
Customizing the Workflow
Changing Who Gets the Alerts
Either update your TELEGRAM_CHAT_ID environment variable or edit the chat_id value directly in the HTTP Request node.
Updating Voluum Credentials
If you ever need to swap credentials (rotation is good practice every few months), update:
VOLUUM_ACCESS_ID
VOLUUM_ACCESS_KEY
Or edit the values in the Set node if you went with the direct paste approach.
Changing How Often It Checks
Open the Cron node and pick a different schedule:
- Every minute (the default)
- Every 5 minutes (lighter on the API)
- Every hour (for less time-sensitive cases)
- A custom cron expression for total control
Wrapping Up
You now have a setup that quietly watches Voluum and lets you know the moment something interesting happens. No more anxiously refreshing your dashboard. No more checking the platform every fifteen minutes during a launch.
The same pattern works for plenty of other use cases too. Once you’re comfortable with this workflow, you can adapt it to monitor specific campaigns, watch for traffic anomalies, alert you when payouts cross a threshold, or even track multiple Voluum accounts at once. The core building blocks (a scheduler, an API call, some smart filtering, and a notification) are surprisingly versatile.
Now go enjoy that coffee break. Your robot has the dashboard covered.



 Facebook
 Telegram